
| Home/ | www.icosaedro.it | |
 Modular programming in C
|
Last updated: 2017-09-13.
2017-09-13 Added examples from the ACM Flight Sim program. 2017-03-25 Removed useless "struct module1_Type;" declaration in opaque type. 2017-03-12 Opaque data types revised. Added references to some useful script: make-makefile, check-included, create-c-module. Added references to some concrete modules of a real examples. |
This paper explains how C programs can be structured by modules.
What modules are
Module interface
Header file: Constant declarationsModule implementation
Header file: Type declarations
Header file: Global variables
Header file: Function prototypes
Main program
Makefile
Modules dependent from other modules
Final suggestions
Tools and examples
Modularization is a method to organize large programs in smaller parts, i.e. the modules. Every module has a well defined interface toward client modules that specifies how "services" provided by this module are made available. Moreover, every module has an implementation part that hides the code and any other private implementation detail the clients modules should not care of.
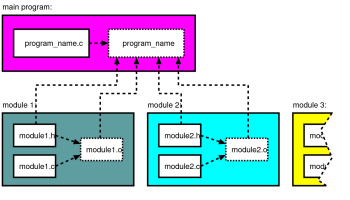
|
Layout of the source three. Dotted boxes are files generated by the compiler, while arrows indicate files involved in their generation. |
Modularization has several benefits, especially on large and complex programs:
Programming by modules using the C language means splitting every source code
into an header file module1.h that specifies how that module talks
to the clients, and a corresponding implementation source file
module1.c where all the code and the details are hidden.
The header contains only declarations of constants,
types, global variables and function prototypes that client programs are allowed
to see and to use. Every other private item internal to the module must stay
inside the code file as they are implementation details clients do not need to know. We will now describe in detail the general structure of
the interface and the implementation files.
Every interface file should start with a brief description of its purpose, author, copyright statement, version and how to check for further updates. All these information are simply C comments or Doxygen DocBlocks.
Proper C declarations must be
enclosed between C preprocessor directives that prevent the same declarations
from being parsed twice in the same compilation run. Here is the skeleton of
our module1.h interface file using Doxygen DocBlocks:
/**
 * Skeleton example of a C module. Illustrates the general structure of a
 * module's interface.
 * @copyright 2008 by icosaedro.it di Umberto Salsi
 * @license as you wish
 * @author Umberto Salsi <salsi@icosaedro.it>
 * @version 2008-04-23
 * @file
 */

#ifndef module1_H
#define module1_H

/*
 * System headers required by the following declarations
 * (the implementation will import its specific dependencies):
 */
#include <stdlib.h>
#include <math.h>

/*
 * Application specific headers required by the following declarations
 * (the implementation will import its specific dependencies):
 */
#include "module2.h"
#include "module3.h"

/* Set EXTERN macro: */
#ifdef module1_IMPORT
    #define EXTERN
#else
    #define EXTERN extern
#endif

/* Constants declarations here. */

/* Types declarations here. */

/* Global variables declarations here. */

/* Function prototypes here. */

#undef module1_IMPORT
#undef EXTERN
#endif
As a general rule, to prevent collisions in the global space of names, every public identifier must start with the name of the module, then an underscore, and then the actual name of the item.
The purpose of the module1_IMPORT and the EXTERN macros
is to allow the same definition file to be included by client modules AND
the implementation of the module, so that global public variables can be declared
only once, and the compiler can check if the function prototypes do really match
their implementation.
And here is the trick. The implementation file module1.c will define the macro module1_IMPORT just before including its own header file; in this way the EXTERN macro is left empty and all the public variables and public functions will result properly defined: variables will be allocated by the compiler in the text section of the generated object file; function prototypes will be checked against their implementation.
Client modules, instead, do not define the module1_IMPORT macro, then the compiler will see only external variables and external functions the linker will have to resolve.
Constants can be both simple macros or enumerative values. Enumeratives are
more suited to define also a new type and are discussed below along the type
declarations. Usually constants are simple int or
double numbers, but also float and literal strings
are allowed.
/* module1.h -- Constants declarations */

#define module1_MAX_BUF_LEN (4*1024)

#define module1_RED_MASK    0xff0000
#define module1_GREEN_MASK  0x00ff00
#define module1_BLUE_MASK   0x0000ff

#define module1_ERROR_FLAG    (1<<0)
#define module1_WARNING_FLAG  (1<<1)
#define module1_NOTICE_FLAG   (1<<2)
This section of the header file contains enumerative declarations, data structure declarations, explicit type declarations and opaque type declarations. Enumeratives are suitable to declare several constants. struct declarations are suitable to declare data structures whose internal details are exposed to client modules.
To enforce the encapsulation of the implementation details, an opaque data type can be declared instead of an explicit data type. Opaque data types are types whose internal details are hidden to the client modules; their actual internal structure is fully declared only in the implementation module, so that client modules cannot access their internal details. This opaque declaration follows this general pattern for the .h and the .c files respectively:
| Opaque data type | |
|---|---|
| module.h | module.c |
typedef struct module_Type module_Type; |
struct module_Type {
	int field1;
	int field2;
	...
};
|
Note that two identifiers are defined: one module_Type is an opaque struct, and the other module_Type is a type derived from this struct type. There is no conflict between these two types because they belong to two different symbol tables inside the C compiler.
The drawback of the opaque types is that clients modules cannot dynamically allocate opaque data structures, nor they can declare arrays or struct fields of such types because their size is known only inside their own implementation; only pointers to such opaque types are allowed:
| Clients can't do this: | ...but can use pointers: |
|---|---|
module1_Type elems[100];  /* ERR */

struct AnotherType {
	int           field1;
	int           field2;
	module1_Type  field3;  /* ERR */
};
|
module1_Type *elems[100];  /* ok */

struct AnotherType {
	int           field1;
	int           field2;
	module1_Type *field3;  /* ok */
};
|
Since client modules can deal only with pointers to opaque types, the
implementation must then provide every allocation and initialization routine that may
be required, whose typical name follows the scheme
module_type_alloc() and
module_type_free() respectively.
/* module1.h -- Types declarations */

enum module1_Direction {
    module1_NORTH,
    module1_EAST,
    module1_SOUTH,
    module1_WEST
};

/**
 * Explicit type declaration example.
 */
typedef struct module1_Node
{
    struct module1_Node *left, *right;
    char * key;
} module1_Node;

/**
 * Alternative opaque declaration of the node above.
 */
typedef struct module1_Node module1_Node;
It is a good rule to avoid public global variables at all. But if you really need them, here is the recipe to deal with their declaration and initialization. The module1_IMPORT macro is required in order to allocate the variable in the "text" section of the code module. Without this macro every client module would allocate its own copy if the variable, which is not what we expect.
/* module1.h -- Global variables declarations */

EXTERN int module1_counter
#ifdef module1_IMPORT
    = -1
#endif
;

EXTERN module1_Node *module1_root;
The preprocessor code protects the initial value from being evaluated by client modules, so that the variables are allocated in the code module and here initialized. Client modules will only see an external variable of some type.
Note that global variables are always initialized to zero and pointers are set to NULL, which typically is just the initial safe value programs expect, so often assigning an initial value is not needed.
All the functions that need to be accessible from client modules must be
declared with a prototype. Remember that functions without arguments
must have a dummy void formal argument, otherwise the compiler
would complain with a quite misleading error message telling the prototype
is missing when it looks to be right there!
/* module1.h -- Function prototypes */

/**
 * Initializes this module. Should be called in main() once for all.
 */
EXTERN void module1_initialization(void);

/**
 * Releases internal data structures. Should be called in main()
 * before ending the program.
 */
EXTERN void module1_termination(void);

/**
 * Add a node to the root three.
 * @param key Value to add to the tree.
 * @return Allocated node.
 */
EXTERN module1_Node * module1_add(char * key);

/**
 * Releases node from memory.
 * @param n Node to release.
 */
EXTERN void module1_free(module1_Node * n);
The implementation module module1.c should include the required headers,
then it should define the module1_IMPORT macro before including its own header
file. By including its own header the compiler grabs all the constants, types
and variables it requires. Moreover, by including its own header file the code
file allocates and initialize the global variables declared in the header.
Another useful side effect of including the header is that prototypes are checked
against the actual functions, so that for example if you forgot some argument
in the prototype, or if you changed the code missing to update the header, then
the compiler will detect the mismatch with a proper error message.
Macros, constants and types declared inside a code file cannot be exported, as them are implicitly always "private".
Global variables for internal use must have the static keyword in order to make them "private".
Remember also to declare as static all the functions that are private to
the code module. The static keyword tells to the compiler that these
functions are not available for linking, and then them will not be visible
anymore once the code file has been compiled in its own module1.o
object file.
Since all the private items are not exported, there is not need to prepend the
module name module1_ to their name, as them cannot collide with
external items. Private items are still available to the debugger, anyway.
/* module1.c -- See module1.h for copyright and info */

/* Import system headers and application specific headers: */
#include <malloc.h>
#include <string.h>
#include "module4.h"
#include "module5.h"

/* Including my own header for checking by compiler: */
#define module1_IMPORT
#include "module1.h"

/* Private macros and constants: */

/* Private types: */

/* Actual declaration of the private opaque struct: */
struct module1_Node
{
    struct module1_Node *left, *right;
    char * key;
};

/* Private global variables: */
static module1_Node * spare_nodes = NULL;
static int allocated_total_size = 0;

/* Private functions: */
static module1_Node * alloc_Node(void){ ... }
static void free_Node(module1_Node * p){ ... }

/* Implementation of the public functions: */
void module1_initialization(void){ ... }
void module1_termination(void){ ... }
module1_Node * module1_add(char * key){ ... }
void module1_free(void){ ... }
Note that public functions are left by last, since usually them need some private function; moreover, since public functions already have their prototype, public functions can be called everywhere in the code above them.
The code file should never need to declare function prototypes, the only exception being recursive functions.
The name of our project will be program_name and its source
file is program_name.c. This source file is the only one
that does not require an header file, as it contains just the public
function main() which does not need a prototype. The main
source includes and initializes all the required modules, and finally
terminates them once the program is finished. The general structure of
the main program source file is as follows:
/**
 * Our sample program.
 * @copyright 2008 by icosaedro.it di Umberto Salsi
 * @license as you wish
 * @author Umberto Salsi <salsi@icosaedro.it>
 * @version 2008-04-23
 * @file
 */

/* Include standard headers: */
#include <stdio.h>
#include <string.h>
#include <stdlib.h>

/* Include modules header we directly invoke here: */
#include "module1.h"
#include "module2.h"

int main(int argc, char **argv)
{
    /* Initialize modules: */
    module1_initialization();
    module2_initialization();

    /* Perform our job. */

    /* Properly terminate the modules, if required: */
    module2_termination();
    module1_termination();

    return 0;
}
Compiling, linking and other common ordinary tasks are usually delegated to a
Makefile, the configuration file for the make
command. make already has default rules that tell how to build
object files *.o out from their source file *.c, but unfortunately it is not
aware of our modular structure of the source. To deal with our modules we have
to tell to make that also *.h header files have to be added to its
dependencies rules. This will require an explicit rule, as we can't rely on the
default one. Moreover the main program, the only one that has not an
header file, must to be compiled with another rule and it may require also to
specify some external library to linking with. Finally, this is the resulting
Makefile skeleton:
# Makefile

# Compiler flags: all warnings + debugger meta-data
CFLAGS = -Wall -g

# External libraries: only math in this example
LIBS = -lm

# Pre-defined macros for conditional compilation
DEFS = -DDEBUG_FLAG -DEXPERIMENTAL=0

# The final executable program file, i.e. name of our program
BIN = program_name

# Object files the $BIN depends on
OBJS = module1.o module2.o module3.o

# This default rule compiles the executable program
$(BIN): $(OBJS) $(BIN).c
	$(CC) $(CFLAGS) $(DEFS) $(LIBS) $(OBJS) $(BIN).c -o $(BIN)

# This rule compiles each module into its object file
%.o: %.c %.h
	$(CC) -c $(CFLAGS) $(DEFS) $< -o $@

clean:
	rm -f *~ *.o $(BIN)

depend:
	makedepend -Y -- $(CFLAGS) $(DEFS) -- *.c
With this Makefile, compiling the source becomes as simple as issuing the
make command alone, no arguments are required. Other tags may also
be present, for example make clean, make dist and so
on. The last tag make depend will be the subject of the next
paragraph.
The source three we considered till now is very simple, with a main program
that depends from several, independent modules. The %.o rule takes
care to update every *.o file if any module source gets modified,
while the $(BIN) rule re-compiles and re-link the main program if
its source or any of the modules gets modified.
But what if some module depends from some other sub-module, either including it
in its header or in its code file? And what if modules, besides contributing to
the main program, are also mutually dependent? The figure below schematically
illustrates a situation in which module1.h/.c requires a sub-module
module4.h, and module2 requires module3.
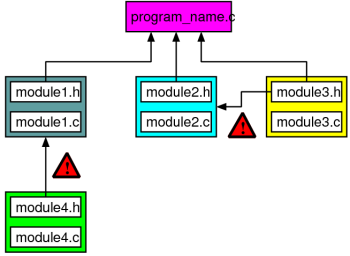
|
A more complex source layout, where module 1 (either in its .h or .c file) requires module 4, and module 2 (either in its .h or .c) requires module 3. If not properly directed, our Makefile in its basic form fails to detect these dependencies, and sources are not re-compiled as required. |
The make command does not parse the content of the files and it
is not aware of these new dependencies. So if we modify module4 it
will omit to re-compile module1, and if we modify
module3 it will omit to re-compile module2. We can
fix simply adding specific rules that handle these dependencies, but we have
also to remember to update these rules according to any change in our source
three layout.
The special tag make depend can do all that boring work for us,
as it builds automatically all the dependencies between the source files,
and appends them to the Makefile itself. Issuing make depend,
in fact, the Makefile gets changed with these new lines:
---- The Makefile as above, but remember to add ----
---- module4.o to the list of the object files. ----

# DO NOT DELETE

module1.o: module4.h
module2.o: module3.h
program_name.o: module1.h module2.h module3.h module4.h
These rules complete the %.o rule we wrote by hand. The last rule reports the
file program_name.o we do not generate, and it is ignored in the
context of our Makefile. So, for example, modifying module4.h
and issuing the make command, the rule %.o causes the
re-compilation of module4.c, the rule module1.o
added by makedepend combined with the rule %.o
causes the re-compilation of module1.c, and finally the rule
$(BIN) produces the updated executable program program_name.
Summarizing, after every change to the layout of the source three it is safe to
update the Makefile issuing the command "make depend", and
then we can use the command "make" as usual to generate the
executable program.
The GNU GCC compiler has a -Wall flag that enables all the possible warning messages. I always use this flag because it helps to write clean code, and it saves from many obscure mistakes that would be difficult to detect otherwise.
You may use the nm command to check if some internal item
(variable or function) escaped from our modularization. This command displays
all the symbols available in the object file, either available to the linker or
to the debugger. For every symbol this command prints also a letter that marks
its status and its availability. Public items (i.e. those that the object file
make available to the client modules) are marked by an uppercase letter B D T
etc. while local symbols have lowercase letters b d t etc.:
$ nm module1.o
00000000 t alloc_Node
0000000c b allocated_total_size
00000014 T module1_add
00000000 D module1_counter
0000001e T module1_free
0000000f T module1_init
00000004 B module1_root
0000000a t free_Node
00000008 b spare_nodes
A simple grep allows to immediately detect variables and items
actually exported by modules:
$ nm module1.o | grep " [A-Z] "
00000014 T module1_add
00000000 D module1_counter
0000001e T module1_free
0000000f T module1_init
00000000 B module1_root
We can improve this shell command writing an useful tool that displays all the private identifiers erroneously exported by each code module:
#!/bin/sh
# Usage: c-detect-private-exported *.o
echo "Detecting private items exported by object files:"
while [ $# -gt 0 ]; do
    base=`basename $1 .o`
    nm $1 | grep " [A-Z] " | cut -d " " -f3 |
    while read id; do
        grep -q -w $id $base.h || echo "    $id"
    done
    shift
done
This script accepts a list of .o files and displays all the
identifiers exported that are not declared in the corresponding .h
file: these symbols can then be readily added to their proper include file.
| Umberto Salsi | Comments | Contact | Site map | Home/ |
An abstract of the latest comments from the visitors of this page follows. Please, use the Comments link above to read all the messages or to add your contribute.
2023-09-25 by Umberto Salsi
Re: Bad HTML generated in CVS view
Guest wrote: [...] In fact the function deObfuscateLinks() from http://www.icosaedro.it/deObfuscateLinks.js is (should be...) executed to de-obfuscate all those links. Maybe you either disabled JS or some filter in your browser prevents the execution of "external" JS.[more...]
2023-09-22 by Guest
Bad HTML generated in CVS view
I was looking at the CVS repository view for the C-modules source tree, and could not click on any files, despite having a note pop up saying "view source" when I hovered my mouse over the file version numbers. Inspecting the selection source for one row of the sources, I see html anchors generated like "<a href2=...". As far as I know, "href2" is an invalid attribute. I suspect some kind of automatic rewrite script has gone wrong.[more...]
2021-01-20 by Umberto Salsi
Re: Congratulations!
Pedro Rondón wrote: [...] I don't know about a "standard" way to organize the directory of a C project, but there are several examples in my repository that (more or less) follow this scheme: An "overall" directory which contains all: - The "public" directory containing stuff meant to be published or released to the customer (more on that next). - The "doc" directory containing private documents or documents that are already available elsewhere (RFC, specifications, etc.). - Several "experimental" directories containing chunks of test code and POC. - The "releases" directory containing previously released source code packages and executable code packages. The "public" directory is the actual project to be released. It could contains: - A "doc" directory containing documents specific of the project meant to be included along with the released packages (design, installation, user manual, maintenance, ...). - A "lib" directory containing external libraries. - A "src" directory containing [...][more...]
2021-01-19 by Pedro Rondón
Congratulations!
simply, straightforward, good explanation, do you have a resource to learn the best way of how to organize a C project folder structure in a "standard" or "typical" way how good C programmers suggest, I don't know if the correct word is architecture, maybe?[more...]
2019-08-23 by Guest
Thanks
Thanks for the explanation, it is very useful to me![more...]